What is the clear aligner process?
We all want to have a more attractive and dazzling smile. After all, your smile is the first thing that others notice about you. Straightening your smile can improve your appearance significantly. Having straight teeth makes you look and feel better. Plus, it’s easier to keep your teeth clean because straight teeth trap food as compared to crooked teeth. This means that straight teeth are also healthier teeth.
What are the different ways I can straighten my smile?

Now that you’re convinced that straightening your smile is a good idea, let’s take a look at how you can do this. Traditionally, braces were your only option to a straighter smile. That all changed some 20 years ago when clear aligner technology was introduced. Clear aligners are a series of plastic trays that move your teeth without the need to wear brackets and wires. Clear aligners are comfortable, barely visible, and they can be removed when needed. In contrast, braces are more painful, can be an eyesore, and are permanently stuck to your teeth for the duration of your treatment. Naturally, most patients love wearing clear aligners. Clear aligners can be used to close small gaps, straighten crooked teeth, fix overbites, and address many other orthodontic misalignments. Let’s take a look at the steps involved in clear aligner therapy:
Step 1: Consultation

To start your clear aligner program you need to make sure that you’re a good candidate for wearing clear aligners. Complex orthodontic conditions, such as a crossbite or underbite, do not qualify for clear aligners and require braces. Schedule a consultation with a local dentist or orthodontist to see if you’re a good candidate for clear aligner therapy.
Step 2: Orthodontic treatment
The next step is to make sure that your teeth and gums are healthy enough to handle orthodontic treatment. Placing clear aligners on teeth with cavities or gum disease is dangerous and risky. You should always obtain clearance prior to starting any type of orthodontic program. This includes a thorough examination of your teeth and gums and a dental cleaning if you’re due one. If there are any essential underlying dental problems, you need to fix them. As soon as you’re cleared, you’re set to start your clear aligner treatment.
Step 3: Dental records

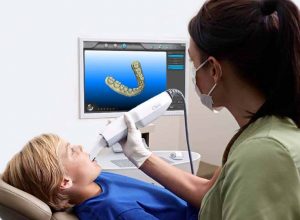
Your dentist or orthodontist must obtain your dental records to design your clear aligner program. The most essential dental records are moldings or digital impressions of your teeth. These are used to communicate your teeth shape, size, and position with the laboratory. Additional dental records may include photos, X-rays, or a bite relationship record. Obtaining dental records is simple and is usually performed on your initial visit.
Step 4: Treatment planning your clear aligner program

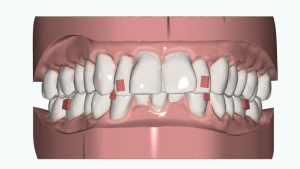
Your doctor gathers all necessary dental records and sends them to the laboratory. The lab technician scans these records into the computer. By following your doctor’s prescription, the lab designs a 3D animation of your projected tooth movement. There are many factors which must be taken into consideration to give you the best end results:
- What do you want to improve about your smile?
- Which teeth should be moved and which ones shouldn’t move?
- Are there any oversized teeth that require contouring?
- Are there any teeth that need to be rotated using excessive torque?
- Does your midline, canine relationship, or molar positions require any type of correction?
Your lab technician designs a projection of your tooth movement and sends it to your doctor. Your doctor either approves this design or modifies the design to improve the results. This process is repeated until your doctor is satisfied with your tooth movement projection. Once your doctor has approved your treatment plan, it’s now time to make the actual clear aligners.
Step 5: Recieve and wear your clear aligners
The lab technician uses 3D printing technology to create a series of clear aligners. You receive your clear aligners at home (for programs like Smile Direct Club™ or Even28 at-home™) or directly from your dentist (for programs like Invisalign®). It’s now time to start wearing your clear aligners. The key to success with any orthodontic treatment is compliance. Wear your clear aligners as instructed. Click here to learn more about the 3 different methods you can wear your clear aligners in order to achieve the best end results.
Step 6: Monitoring your progress
Simple orthodontic treatment can be completed using at-home clear aligners. For these super simple cases, it’s not necessary to visit your dentist or orthodontist every few weeks. However, for more complicated tooth movements you must visit your dentist or orthodontist periodically. Typically, you need to visit your dentist or orthodontist every two to eight weeks, until you’re treatment is complete. Your doctor will perform treatments such as tooth contouring, attachment placement, or bite calibration. They also monitor your progress to ensure that your treatment is going as planned and make corrections when necessary.
Step 7: Review your end results

Wearing clear aligners without proper dentist supervision could mess up your bite, harm your teeth, or damage your existing dental restorations. Be sure to follow-up with your dentist to make sure that your treatment has gone according to plan. Your doctor may take additional corrective measures to fix unforeseen issues. This involves bite calibration, additional tooth contouring, or requesting additional clear aligners for corrective measures.
What are my options for straightening my teeth using clear aligners?

Clear aligners are becoming more and more popular these days. There are now more than a dozen different companies that can help you straighten your teeth using clear aligner technology. We categorize clear aligners as either at-home or dentist-supervised programs. Here’s how each one works:
At-home clear aligner programs
At-home clear aligner is only suitable for the simplest orthodontic conditions. This includes closing small gaps, straightening slightly crooked teeth, closing very small overbites, and other minor orthodontic tooth conditions. Here’s a list of a few different options for receiving at-home clear aligner therapy:
Dentist-supervised clear aligner programs
More complex tooth movements always require dentist supervision. Keep in mind that your dentist does more than just hand your clear aligners, for example:
- They can place attachments (buttons) to torque stubborn teeth
- They perform tooth contouring to create additional room for tooth movement
- They adjust your bite to correct any potential interferences
- They monitor your progress to make sure your treatment goes as planned
Dentist-supervised clear aligner programs can fix more advanced orthodontic conditions. These include moderate teeth crowding, mediocre overbites, some openbites, and other moderate-to-advanced orthodontic misalignments. Here’s a list of a few different dentist-supervised clear aligner treatment options which you can choose from:
- Invisalign
- ClearCorrect
- Local labs that offer clear aligner programs
How do I start with my clear aligner treatment?
Now that you understand how clear aligners work, it’s time to find a great dentist to straighten your smile! Click on the link below to go to our Search Engine and search nearby dentists. Look through their profiles to learn more about them, including their treatment photos and reviews. when ready, you can even book your appointment online. Best of luck with your clear aligner journey!
0 Comments